Let’s Bounce a Ball on our Heads!
An exploration of Headbounce Technique
This guide will help you:
- Pick and maintain the best ball for headbouncing.
- Learn how to spot the ball you’re bouncing.
- Learn good form that will help you as you progress.
- Train to achieve headbounce proficiency, so you can add a juggle later on.
Prerequisites
- Head.
- Ball.
- You’re looking for a round, inflated ball that doesn’t have any lumps. If you’re not sure if the ball you have is true or not, throw it in the air with a flick of the wrist. If the ball wobbles off axis, it’s not a good ball for headbounce.
- Many people start with a child’s playground ball, then eventually upgrade to a lightweight rhythmic gymnastics ball. (Gatto used to perform headbounce with a small kickball he bought from Target! However, kickball manufacturers are making less balanced items these days – if you want to go that route, you should definitely go to a store and test their inventory with a good wrist-flick.
- Balance a club on your forehead and juggle. Bouncing a ball on the head and juggling (our end goal!) is substantially more difficult than balancing an object while juggling. Since you bounce on the forehead and not the chin or the nose, you should be proficient with a forehead balance. (Haven’t started working on that yet? Learn to balance and juggle here!)
Where to Bounce?
The same spot as where you balance a club – right where the third eye would be.
Wikipedia says that in “…New Age spirituality, the third eye often symbolizes a state of enlightenment or the evocation of mental images having deeply personal spiritual or psychological significance.” That’s great! Let’s close that third eyeball up and bounce a ball on it.
How high to bounce? How to inflate the ball?
These two questions are intrinsically related.
A common misconception is that headbouncing is simply standing under the ball as it bounces off the skull. This is not the case.
The ball travels 6-8 inches vertically, driven by the force of your knees and feet. It does not simply rebound – each bounce is a conscious placement of the ball into the air.
I like to think of the ball being thrown by the head – it’s that kind of deliberate action, where you are aware of the object’s future trajectory as it makes impact with your head. That might sound insane at first (…and I get it, your third eye is covered up – not a great time to get esoteric!) but that’s something to meditate on.
The ball should be inflated so it has some give to it. You are exerting the force onto the ball to make it bounce. If the ball is overinflated (so the ball has a very strong natural rebound,) it will be more sensitive to the curvature of your forehead so it glances off at an angle more easily. If it’s underinflated (so the ball has virtually no natural rebound,) you’ll have to practically jump to get it to go anywhere.
Experiment with different inflations and see what works for you – eventually, you’ll know the best inflation for you just by feel. If you were to drop the ball I use on the ground, it would rebound around 60%.
Can you get hurt doing this?
Sure.
If you don’t have good form, you’ll likely feel pain in your neck – similar to when you learned to balance. If you overtrain from the start, it’s also possible to get a repetitive stress injury – you’re using a lot of little muscles that you don’t often use in your everyday training.
I’ll stress the importance of a lightweight ball here. Most rhythmic gymnastics balls are around 400g, and that’s far too heavy. I’ve heard at least one anecdote of a juggler detaching his retina because he use a ball heavier than that just to see if it was possible. At 400g, you’ll probably just end up with a headache, but I’d opt for a ball that’s 300g or lighter.
A quick note about Needles.
There are a variety of needles that you can use to inflate a ball. They are not all equal.
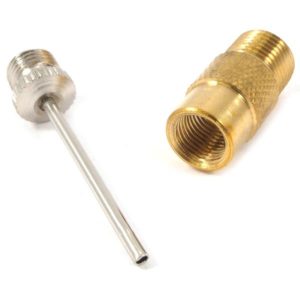
The needle pictured here could easily destroy the ball you worked so hard to find. Look at the tip – it’s completely sheer at the end. If you’re using a ball like a Sasaki M20C (my personal favorite,) you could rupture the gasket of the inner bladder with that edge.
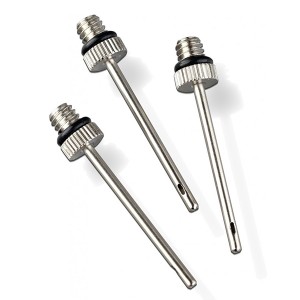
You want to find a needle that has a tapered point.
Before you adjust your ball’s inflation, coat the tip of the needle in petroleum jelly (Vaseline, etc.) Slowly twist the needle as you insert it – don’t just slam it in there.
This might sound extremely nitpicky, but if you’ve shelled out $80 for a rhythmic gymnastics ball, you need to make sure it’ll last a long time! I’ve ruined a few balls by using the wrong needle and would hate for you to experience the anguish of explaining why you’re so upset to your friends. (They’ll make fun of you.)
How to Bounce?
Here’s one of the big secrets to headbounce – the bouncing action comes from your knees and ankles.
Put your weight into the balls of your feet, with a softness in the knees. Try bouncing up and down in that position while looking up. It’s a small motion that changes your vertical posture by about an inch.
Corrections come from small shifts in the angle of the head and the neck.
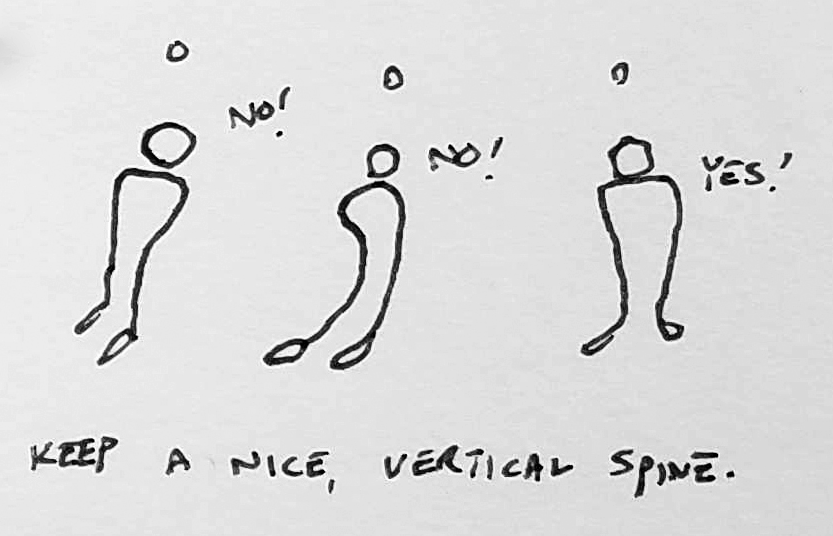
The most important thing of all is your form. Whatever you do, do not bend!
The upward angle of your head is distributed between your neck is also taken into the thoracic spine (that is, your uppermost back.) Your abs are engaged, and your pelvis is tucked. You want to keep a nice, rigid, vertical spine.
When I talk about “bending” (or rather, not bending,) I’m talking about the tendency to compromise your form in order to make a bounce. When you first start training this skill, you’ll sometimes want to “dig” under the ball – hunching over or bending backwards to try and get another bounce. The resulting bounce will require another counter-correction, and so will the next, and so on and so forth until you give up on juggling forever. It’s difficult at first, but learning the posture when you begin will pay dividends as your training progresses.
Where should you Look?
“Spotting” the ball will seem difficult at first. At the beginning, many headbouncers look at the center of the ball. This is wrong.
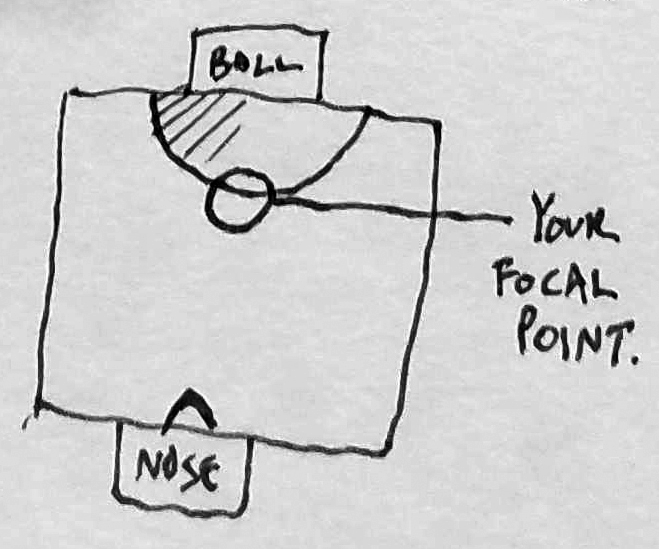
When headbouncing, you should attend to the horizon of the ball – the lower edge of the ball in your two-dimensional picture plane. You’re looking as much at the ball as the negative space surrounding it.
This diagram represents your two-dimensional picture plane of vision. The ball it at the peak of its trajectory, and is beginning its descent to your forehead. You’re looking up from underneath it.
This probably sounds silly and needlessly difficult at first. However, it’s an extremely important technique to cultivate early! Down the road, when you’re working on juggling with a headbounce, you’ll be delighted to notice that you have more peripheral vision to work with than you would with a different focal point.
Bouncing Drills.
The Pyramid Progression.
This is a drill that Anthony Gatto swears by in his headbouncing workshop video. (The page where he sells the workshop is here, but it’s not clear if it’s still available or not.)
The goal is to slowly increase the number of bounces executed incrementally, without moving your feet. The ball is thrown, bounced, then caught.
Here’s a sample of what a beginner’s progression might look like.
1 bounce * 15 times. (Throw, bounce once, catch – repeated cleanly fifteen times in a row before advancing.)
2 bounce * 10 times. (Throw, bounce twice, catch.)
5 bounce * 5 times.
10 bounce * 3 times.
25 bounce * 1 time.
Once you can execute this progression cleanly, step it up! Can you get 50 bounces in a row without moving your feet? Can you go for a minute straight?
Bouncing while Sitting.
This is a drill that Scott Sorensen, an outstanding juggler from Texas, likes to do.
Can you complete the pyramid progression while seated? Can you sit down while bouncing a ball?
The bouncing action is executed through a lengthening of the spine in this drill, rather than the toes and knees.
The Bounce and Pivot.
This is one of my favorite drills, because it forces you to attend to the ball’s horizon. It’s great for learning the tempo of the bounce, and your relationship to the ball in space. It’s super disorienting at first, and you’ll feel like an idiot. I’m not conspiring to make you look silly – this is seriously good training.
The drill is exactly what it says on the tin – while bouncing the ball on your head, pivot 360 degrees slowly. You’re not walking in a circle, you’re standing in one spot and slowly rotating. Try it in one direction, then try it in the other direction.
Once you have achieved some proficiency with that drill, try to complete the pivot by snapping 90 degrees under the bounce. (This makes for a very pretty image on stage, too!)
Absorbing a Bounce.
Bounce the ball at normal height, then punch a bounce extremely high. It’ll feel like you’re jumping at the ball with your head, like some kind of soccer allstar. (Or, like you’re doing another one of Anthony Gatto’s preferred drills.)
When the high ball returns, absorb the impact with your knees and continue bouncing the ball at your normal height.
Go for a run. (No, really.)
This is one of my favorite exercises, and a suggestion by our main man Lewis Kennedy.
In stark contrast to all of Gatto’s talk about standing in one place, Lewis suggests that you bounce a ball on your head and start walking. Once you have that under control, pick up the pace. And faster. And faster. How fast can you run while maintaining control of the ball?
How do I know I’m doing a good Job?
The ball doesn’t lie!
When you correct while headbouncing, the ball will spin slightly. If the ball rotates all over the place, you’re making a lot of corrections. If the ball is bouncing without any kind of spin, you’re making lots of very clean hits.
Anthony Gatto, in a headbounce tutorial he used to sell online, said that he didn’t like it when the ball bounced on his head with the valve… so he just made sure to bounce it with the valve pointing away from his forehead. I guess when you have perfect technique, it really is that simple.
How long will this take me?
If you start and finish your training with five minutes of headbounce drills, you could realistically have control over a headbounce within six months.
Learning to juggle with a headbounce is much more challenging than learning juggle with a balance. If it’s any perspective, I’d qualified five clubs with a balance before I’d qualified three clubs with a bounce. It’ll take time, but it’s definitely worth it.
What’s the next step?
Once you have developed a sense of mastery, look in the mirror and start reciting those positive affirmations: The next step is learning to juggle while bouncing a ball on your forehead.
Video Inspiration
Here’s the trailer for Anthony Gatto’s headbounce workshop.
Laido Dittmar is an incredible Hungarian juggler, currently working for Cirque du Soleil’s reboot of “Corteo.”
Evgeni Biljauer was one of the few jugglers to master bouncing two balls on his head at the same time. Check out 1:50 of this video to see what I’m talking about.
The legend Enrico Rastelli can be seen performing a variety of headbounce tricks, including two balls on the head, at around 4:59 in this video.
Here’s Anthony Gatto’s routine from Cirque du Soleil’s “Kooza.” You can see headbounce peppered throughout this incredible routine, including a seven ring pulldown under a bounce and his famous three clubs with a bounce sequence.
America’s own Scott Sorensen attempts the world record with five ring with a bounce in this video. He has a number of other incredible headbounce videos on this YouTube channel as well.

